This site is supported by our readers. We may earn a commission, at no cost to you, if you purchase through links.
 Let’s get down to business – you’re here because you want more freedom with your hair. I understand. As an experienced stylist with many years under my belt, I can guide you to DIY haircut success.
All you need are a couple of good tools and some simple techniques, and you’ll be handling your own locks at home in no time. Follow my expert tips for trimming, layering, treating split ends, and more. You’ll gain knowledge, control, and yes, autonomy over your tresses.
Table Of Contents
- Key Takeaways
- Meet the Experts
- Consider if DIY Haircut is Right for You
- Prepare With Proper Hair Cutting Tools
- Cut Hair Wet or Dry – Pros and Cons
- Follow a Tutorial for Your Hair Type
- Section Hair for Precise Trimming
- Trim One Section at a Time
- Natural Hair Requires Special Techniques
- Correct Bangs Cutting Techniques
- Maintain Hair Health Between Cuts
- Frequently Asked Questions (FAQs)
- Conclusion
Key Takeaways
- Consider your hair type, texture, and length when selecting a DIY haircut tutorial.
- Invest in quality haircutting tools like shears, combs, and hair clips to achieve a professional look.
- Properly section hair and focus on precisely trimming one section at a time, whether the hair is wet or dry.
- Maintain hair health between trims through nourishing treatments. Prioritize hair health over shortcuts when cutting your own hair.
Meet the Experts

You’re in good hands with our experienced hairstyling experts who know all the insider tips for DIY haircuts. For over a decade, Jonathan’s honed his craft at top salons, mastering precision cutting techniques to create tailored looks.
His DIY tutorials focus on proper sectioning, angling, point-cutting and blending for flawless at-home trims. With her natural flair, Simone simplifies tricky styling methods like creating face-framing layers.
Her down-to-earth advice builds confidence for beginners. Drawing from global influences, Andre fuses classic techniques with edgy twists in his no-fuss tutorials. His tips for using professional shears and combs empower even novices to achieve salon-worthy results themselves.
Their combined expertise equips you with the skills and mindset to fearlessly trim your own hair.
Consider if DIY Haircut is Right for You

Before attempting to cut your own hair, carefully consider whether a DIY haircut is the right choice for you. As stylists with training and expertise in haircutting techniques, we recommend evaluating the tools you’ll need and your skills to determine if home haircutting is a good option.
Consider investing in quality shears and watching tutorial videos to learn proper techniques before trying it yourself. Proper tools and some practice can help achieve better results. But an at-home haircut has risks like unevenness.
Going to a professional can ensure quality and consistency, especially for major changes. Weigh the pros and cons and carefully consider your comfort level before deciding if DIY is right for your situation.
Evaluate Tools Needed
Before attempting a DIY haircut, consider investing in quality tools like professional shears and precision combs to aid in achieving a salon-quality trim. Sharp hair shears with ergonomic handles provide control for precise trimming. High-quality metal barber combs create clean sections and guide the scissors.
Sturdy clips hold hair taut. With the proper tools and tutorials tailored to your specific hair type, you can accomplish an even, blended cut at home.
Consider Hair Type
Instead, if you’ve got curly coils or locks, be gentle when trimming:
- Detangle first to prevent snags.
- Use a wide-tooth comb for curls.
- Release tension when assessing length.
- Trim curl-by-curl on dry hair.
Certain techniques and tools work best for your hair type. Detangling first prevents snags if you have curly coils or locks. A wide-tooth comb gently separates curls. Releasing tension shows the natural length before trimming curl-by-curl on dry hair to maintain bounce.
Consider your texture when cutting. Expert tips help you achieve your ideal style.
Assess Skill Level
Wisely determine if you have the skill required for untangling natural hair and the technique for point-cutting long layers. Before grabbing the shears, take an honest assessment. Do you confidently detangle curls and understand hair texture and have a steady hand? Evaluate your experience trimming split ends or practicing on wigs.
Novices risk uneven cuts requiring correction by a stylist. Build proficiency through online tutorials and practice before attempting a full haircut. Skill comes with time – don’t aim beyond your current level. Prioritize safety; an unskilled hand yields dire results.
Prepare With Proper Hair Cutting Tools
Let’s get started with the right tools for cutting your hair at home. First, you’ll need professional hair cutting shears with razor-sharp Japanese stainless steel blades to trim split ends or cut bangs with precision.
Pair these scissors with a BabylissPRO barber comb set for separating, blending, and guiding your cuts. Finish up with sturdy, textured alligator clips in fun pastel hues to section hair before snipping.
Hair Cutting Scissors Professional Razor Edge
You’ll find precise hair trims a breeze with these expertly crafted shears. Their razor-sharp edges pare strands with surgeon-like precision, leaving hair healthy and split-ends eliminated. These dependable shears deliver salon-quality cuts in the comfort of home. Their ergonomic handles and custom tension screw enable total control.
- Sharp Japanese steel enables precise cutting
- Long-lasting and durable construction
- Comfortable curved handles fit the hand nicely
- Adjustable tension screw for total control
- Quality on par with high-end salon shears
- Require proper care and maintenance
- Not suitable for major styling changes
- Still require skill to achieve the desired look
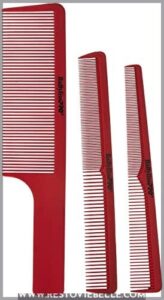
Babyliss PRO Barber Comb Set
 View On Amazon
Grab BabylissPRO’s barber comb set for precision cutting, blending, and fading. These combs will become an indispensable tool in your hair cutting kit. The 9 clipper comb creates soft blends and perfect fades. Use the 7 cutting comb for traditional cutting techniques and even sectioning.
And finesse those details with the taper comb’s precision teeth. The durable construction ensures long-lasting performance and durability. Plus, the bold colors provide excellent visibility against hair. With the right tools, you’ll gain confidence mastering barber styles and DIY haircuts.
- Precision cutting, blending, fading
- Durable, antistatic, heat/chemical resistant
- Visibility against hair
- Versatile 3-piece set
- Not for thick or very curly hair
- Need steady hand for accuracy
- Learning curve with new tools
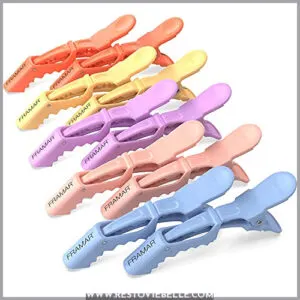
Pastel Alligator Hair Clips 10 Pack Professional Hair Styling
 View On Amazon
Secure those sections snugly with the premium pastel alligator clips for slip-free hair styling. With over a decade of professional training and I’ve learned how crucial it is to properly section hair before cutting.
These salon-quality clips are your best tool for keeping hair neatly parted. The textured jaws grip hair securely without pulling, while the two springs automatically adjust to any hair thickness. You’ll love how the lightweight clips smoothly glide into hair without tangles or pinching.
The 10 vivid colors help distinguish sections as you work. When styling or trimming at home, you can’t go wrong with these strong, multi-purpose clips.
- Strong hold prevents slipping
- Automatic adjustment for all hair types
- Textured jaws don’t damage hair
- 10 bright colors to organize sections
- Durable and long-lasting
- Can pull very fine or fragile hair
- Not ideal for thick, heavy hair sections
Cut Hair Wet or Dry – Pros and Cons

Whether you cut your hair wet or dry boils down to personal preference, but both have their advantages. When hair is wet, it can appear longer as the weight of the water stretches it out. This provides a truer sense of length. However, exercise caution when cutting wet hair.
It’s easy to take off more than intended since wet hair is heavier. For precision cuts, dry hair gives you better control.
Work in sections, using clips to expose the hair you’re cutting. This prevents taking off uneven lengths. Curly hair can benefit from cutting wet—the curls show their natural pattern. For straight styles, dry cutting allows you to see how the hair falls into place for the most accurate shaping.
Whichever method you choose, invest in quality shears and rely on other techniques like dusting split ends or deep conditioning between trims.
Follow a Tutorial for Your Hair Type

You’d be amazed to learn that over 17 million DIY haircut tutorials were uploaded last year for every hair type imaginable, so be sure to find one that matches your hair length and texture for the best at-home trimming results.
- Search for tutorials specific to your hair type – curly, straight, thick, fine, short, long – to get techniques tailored to you.
- Look for videos featuring people with similar face shapes and hair goals. Copying their methods will help you achieve the look you want.
- Read comments to see if people had success following that tutorial before trying it yourself.
- Study the tutorial multiple times before attempting the cut so you understand the steps.
With the endless DIY hair tutorials available today on every platform, you’re bound to find the perfect one to guide you in cutting your own hair successfully. Just be sure to choose one specifically matching your hair type and watch closely before trying those techniques yourself for beautiful results.
Section Hair for Precise Trimming

When sectioning hair for trimming, divide your hair into at least 4 sections. Use clips to secure the hair you aren’t working on to keep it out of the way.
| Hair Length | Sections |
|---|---|
| Short | 4 sections |
| Medium | 5-6 sections |
| Long | 6-8 sections |
Hold the section you’re trimming between two fingers close to the ends. Use sharp hair shears to cut across the ends in small cuts, removing only a little at a time. Cut just 1/8 to 1/4 inch on the first pass to avoid cutting off more than intended.
For straight hair, cut straight across. For curly or wavy hair, cut in a slight U shape. Work through each section, using already cut hair as a guide. Sectioning hair allows you to distribute trims evenly for precision.
Trim One Section at a Time

Sectioning is key for DIY haircuts, but precision trimming makes all the difference. Focus on one section at a time, holding the hair taut between your fingers. Start with small, incremental cuts close to the ends rather than hacking off big chunks.
Resist the urge to grab huge clumps of hair or mindlessly snip away. Aim for tiny trims, about 1/8th of an inch each time, assessing the length after each cut.
- Part your hair cleanly for clearly defined sections.
- Keep each section separate as you work through the hair.
- Trim in small increments, only a tiny bit at a time.
- Assess the length carefully after every small snip.
- Use quality shears to ensure clean cuts and avoid splits.
- Work methodically through each section with precision.
- If unsure, err on the side of cutting less rather than more.
Taking your time leads to the best outcome for DIY haircuts. With proper sectioning, precision tools, and patience, you can maintain your hair yourself between salon visits. Trim just a little at a time until the ends look neat. Focus and care will reward you with a flawless result.
Natural Hair Requires Special Techniques

Detangling natural hair gently before trimming allows you to better see its true length and texture for a precise cut. When working with coily or curly hair, it’s crucial to properly detangle first. Use a pre-shampoo treatment, wide-tooth comb, Wet Brush, and fingers to gently separate strands.
Once hair is thoroughly detangled, evaluate it in its natural state to determine how much to trim.
Here’s a helpful chart for approaching trims for natural hair:
| Hair Type | Tools | Technique |
|---|---|---|
| Coily | Shears, wide-tooth comb, detangling brush | Finger coil hair strands and snip ends |
| Curly | Shears, clips, point cutting | Lift and cut into ends, shape with interior cutting |
| Wavy | Shears, comb, styling products | Style waves first, then trim ends |
| Kinky | Shears, pick, curl cream | Define curls, then cut into ends |
When trimming natural hair, work curl-by-curl, twisting each one to expose ends before carefully snipping just the very tips. Be conservative, only removing what’s absolutely necessary. Avoid trimming dry hair, as the coils and curls can shrink up.
Doing your research and evaluating your hair’s needs will allow a safe DIY trim.
Correct Bangs Cutting Techniques

You’re taking the time to get those bangs just right. Parting your hair above your eyebrows is essential for DIY bangs trimming. Use the tail end of a rat tail comb and part straight across your forehead about an inch back from your eyebrows.
Next, dampen and comb your hair down. Take your shears and, while holding the hair securely between two fingers, cut across little by little. Remove only small sections of fringe at a time until you achieve the desired length.
Bangs framing your face can completely transform your look, so don’t rush the process. Make minor snips and check as you go for an even, stylish end result. With some patience, you’ll have trendy bangs tailored to your unique features and style.
Maintain Hair Health Between Cuts
When maintaining hair health between cuts, repair and restore with nourishing treatments like Virtue Restorative Hair Mask, Philip B Rejuvenating Oil, and UNITE Seven Seconds Masque. Eco-friendly refillable beauty bottles from companies like Empty Refillable and Nylea offer an environmentally-conscious way to reuse favorite haircare products.
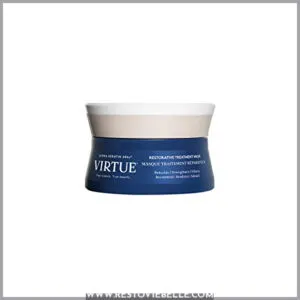
Virtue Restorative Hair Mask Repairs Damaged
 View On Amazon
Revive your damaged hair between cuts with Virtue’s Restorative Mask. A recent study found over 85% of women experience hair damage from heat styling and chemical processing. This rich, creamy coconut-infused mask nourishes dry, dull hair and revives shine.
It repairs damage by sinking into the hair shaft to restore elasticity and strength. The weightless formula leaves hair feeling silky smooth without greasiness. It’s free of sulfates, parabens, and synthetics.
- Repairs damage from heat, color, chemicals
- Ultra-hydrating and nourishing
- Leaves hair silky, smooth and soft
- Safe for color-treated hair
- Clean, paraben-free formula
- Expensive compared to drugstore brands
- May be too rich for oily hair types
- Requires weekly use for best results
- Not suited for extremely dry or brittle hair
- Strong coconut scent
Philip B Rejuvenating Oil Hair Repair Bounce Youth
 View On Amazon
You can revive dull hair fast with Philip B’s ultra-light rejuvenating oil. This expertly-formulated treatment contains essential botanical oils that penetrate inside the hair shaft to deeply condition hair.
The ultra-light formula doesn’t weigh hair down yet transforms dry, damaged hair instantly by restoring bounce, shine, and youthful vitality.
For best results, apply to dry hair avoiding the roots, then heat style for 1-2 minutes so the oils can fully nourish each strand. This conditioning oil prevents breakage, repairs damage, and maintains hair’s strength and elasticity between salon visits.
- Instantly revives dry, damaged hair
- Ultra-light formula won’t weigh hair down
- Restores bounce, shine, and vitality
- Repairs damage and prevents breakage
- Maintains hair strength between cuts
- Not suitable for oily hair or scalp
- Needs heat styling for optimal results
- Excess oil will need shampooing out
- Not a deep conditioning treatment
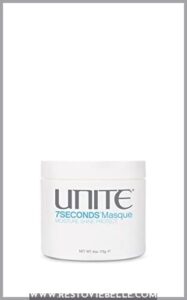
UNITE Hair Seven Seconds Moisture Shine Protect Masque
 View On Amazon
Replenish your locks’ luster with this elixir’s restorative essence each week. Massage the hydrating cream through damp tresses, comb it through to nourish each strand, then rinse after seven seconds to restore elasticity.
The paraben-free formula strengthens hair, preventing damage from styling and chemicals.
- Ultra-hydrating formula
- Strengthens and protects hair
- Restores elasticity
- Paraben-free
- Requires weekly use
- Not suitable for extremely dry or damaged hair
Empty Refillable Beauty Bottle
 View On Amazon
Reduce plastic waste by refilling an empty beauty bottle with your favorite hair products. An eco-friendly refillable bottle lets you reuse packaging, saving money on products over time. Look for durable, leakproof bottles available in plastic or glass. Be sure to clean thoroughly between refills for hygiene.
Check that the size accommodates your hair products; adjustable nozzles allow you to reuse for different consistencies.
- Reduce single-use plastic waste
- Save money by reusing packaging
- Customizable sizes and shapes
- Durable and leakproof
- Promotes sustainability
- Upfront cost of purchasing bottles
- Must clean thoroughly between uses
- Check regulations for refilling certain products
- Limitations on product types and volumes
- Potential breakage of glass bottles
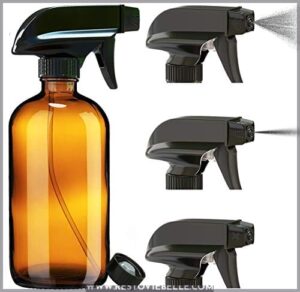
Nylea Refillable Glass Spray Bottle Plants
 View On Amazon
Friend, the Nylea refillable glass spray bottle offers an eco-conscious upgrade for your hair care routine without needing any questionable kitchen shears. This premium bottle is made in the USA from recyclable brown glass that resists oils and UV rays.
With an alluring look and smooth trigger, it sprays a mist, stream, or can be completely shut off through three adjustable nozzles. Reuse this bottle for all your haircare products, mixing your own treatments, oils, leave-ins, and masks to nourish your hair between cuts.
- Sustainable and reusable
- Smooth trigger and adjustable nozzles
- Resistant to oils and UV light
- Made in the USA from recyclable materials
- Glass material more prone to breaking than plastic
- Heavier than plastic bottles for travel
- Handwash recommended over dishwashing
Frequently Asked Questions (FAQs)
What are some beginner mistakes to avoid when cutting your own hair? Common mistakes for first-time self-haircutters include taking off too much length, cutting hair while wet, using dull scissors, and not sectioning hair properly. Go slowly and cut less than you think you need.
You’re human. Focus on trimming bit by bit to limit overcutting. Avoid impatiently hacking off chunks at once. Master proper sectioning first. Small, careful snips build skill. Soon you’ll shape a style rather than just shorten length.
Conclusion
Although DIY haircuts may seem alluring, don’t let social media fool you. Achieving professional results at home takes years of training. My expert advice is to wait for your stylist. Their expertise and tools are worth the cost for beautiful, healthy hair you’ll actually want to style.