This site is supported by our readers. We may earn a commission, at no cost to you, if you purchase through links.
To straighten hair with a blow dryer, you’ll want to first towel dry and apply a heat protectant**.
Comb through any tangles.
Section hair and clip away top layers.
Holding the dryer several inches from your head, dry each section at medium heat, keeping it taut over a brush. Pull the brush from roots to ends to straighten strands.
Once fully dried, finish with the cool setting** and an anti-frizz serum.
A nozzle attachment and the right brushes help achieve sleeker results. The technique takes some practice but allows you to maintain your style’s smoothness.
Table Of Contents
- Key Takeaways
- How to Straighten Hair With Blow Dryer?
- Preparation
- Blow Drying Technique
- Sectioning and Drying
- Finishing
- Tools and Accessories
- Frequently Asked Questions (FAQs)
- How can I prevent my hair from getting frizzy while blow drying?
- What is the best heat setting to use when blow drying hair straight?
- How often should I use a heat protectant product when blow drying my hair?
- Can I use a round brush to blow dry my hair straight?
- How can I achieve a smooth finish when blow drying my hair straight?
- Conclusion
Key Takeaways
- Towel dry hair before blow drying to remove excess moisture and create a smooth canvas for styling.
- Apply a heat-protective product to shield hair from damage caused by high temperatures during blow drying.
- Use a wide-tooth comb to remove tangles and a gentle wet brush for detangling, being careful not to damage delicate or damaged hair.
- Hold the dryer several inches from the head and use a medium heat setting to minimize damage and ensure even heat distribution.
How to Straighten Hair With Blow Dryer?
To straighten hair with a blow dryer, start by drying your hair until it’s damp, then use a round brush to pull sections taut while blow drying on a medium heat setting. This technique helps achieve sleek, straight hair by reducing frizz and adding shine.
Preparation
First, you’ll want to towel dry your hair to remove excess moisture, leaving it slightly damp. Next, apply a heat-protective product to shield your strands from potential damage caused by high temperatures during blow drying.
Towel Dry Hair
Before you begin blow drying your hair, it’s imperative to towel dry it first. This step aids in removing excess moisture and prepares your hair for styling. Here’s how to do it correctly:
- Towel Preparation: Use a soft, clean towel to gently squeeze out excess water from your hair. Avoid rubbing or wringing your hair, as this can cause frizz and damage.
- Moisture Absorption: Press your hair with your hands to remove as much water as possible before using the towel. This helps the towel absorb more moisture effectively.
- Hair Texture: Be considerate with your hair, especially if it’s delicate or damaged. Towel drying shouldn’t cause further damage or breakage.
- Damage Prevention: After towel drying, let your hair air dry for a while before using a blow dryer. This helps to prevent heat damage and preserve the natural texture of your hair.
- Pre-Styling: Towel drying is also a vital step in pre-styling your hair. It helps to create a smooth canvas for your blow dryer to work on, ensuring a more even and controlled finish.
Apply Heat-protective Product
When drying your hair with heat, it’s crucial to utilize a heat-protective product to safeguard your hair from the detrimental effects of heat styling. Heat protectants are engineered to establish a barrier between your hair and the heat, mitigating the damage caused by high temperatures. Here are several key factors to bear in mind when applying heat-protective product:
- Type of product: Heat protectants are available in various formats, such as sprays, creams, or serums. Select a product that aligns with your hair type and preferences.
- Ingredients: Seek ingredients like silicones, humectants, amino acids, and natural oils that assist in protecting and nourishing your hair.
- Application method: Apply the product uniformly to damp or dry hair, as per the product instructions.
- Importance: Heat protectants aid in preventing damage caused by high heat, preserve hair’s natural moisture, and maintain your hair’s lustrous and healthy appearance.
- Hair dryer compatibility: Verify that your hair dryer is compatible with the heat protectant you choose, as some products may not function effectively with certain types of heat styling tools.
Comb Hair to Remove Tangles
Comb hair to remove tangles before blow-drying.
Use a wide-toothed comb with rounded bristles to avoid damaging your hair.
For thick or curly hair, start from the ends and work your way up to the roots.
For fine or straight hair, start from the roots and work your way down.
Always use tension when combing to avoid breakage.
Comb gently and evenly to guarantee a sleek, smooth finish.
Use Gentle Wet Brush
After combing out those pesky tangles, it’s time to grab your gentle wet brush.
Think of it as your hair’s new best friend.
Whether you’re reaching for a boar-bristle brush for that sleek finish or a metal brush for some added oomph, make sure it’s kind to your locks.
Keep it clean and dry it properly to avoid any hairy situations.
The right brush can make all the difference.
Blow Drying Technique
You’ll want to hold the blow dryer several inches from your head and dry your hair around 80% without using a brush. During this initial rough drying stage, comb through your hair frequently to make sure all layers dry evenly, pointing the dryer down the hair shaft and using a medium heat setting.
Hold Dryer Several Inches From Head
Holding the hair dryer several inches from your head is a vital step in blow drying hair.
This distance allows for more equal heat distribution and minimizes the risk of heat damage** to your hair.
The heat from the dryer can cause damage if it’s too close to your hair, particularly if you have fine or thinning hair.
Keeping the dryer at a distance also helps to prevent excessive heat buildup, which can lead to frizz and static.
For thick hair, it’s advised to hold the dryer about 6 to 8 inches away from your head to ensure efficient drying without causing damage.
Dry Hair 80% Without Brush
Dry hair quickly and prevent damage by blow drying 80% of your hair without a brush. This helps avoid tangles and achieves smoothness. Blow dry hair evenly, avoiding humidity, and use anti-frizz serum or leave-in conditioner. Dry bottom layers first, then move to top layers. Dry each section completely before moving on to the next.
Comb Through Hair to Help All Layers Dry Evenly
Comb through your hair to help all layers dry evenly.
This step is very important for achieving a smooth and uniform blowout.
You can use either your fingers or a brush to comb through your hair, making sure that all layers are getting equal attention.
If you choose to use a brush, make sure it’s the right size for your hair and section.
The brush should be gentle on your hair to avoid causing damage or breakage.
Additionally, use a heat protectant product before blow-drying to shield your hair from heat damage.
Remember to comb your hair from the roots to the ends, and avoid pulling your hair too tightly, as this can cause tangles and breakage.
Point Dryer Down Hair Shaft
To achieve smooth hair with a blow dryer, you should point the dryer down the hair shaft. This helps prevent damage and makes sure the hair is dried evenly. Here are three tips to follow:
- Point the dryer down the hair shaft to prevent damage.
- Use the cool setting to finish for a sleek, straight look.
- Apply anti-frizz serum or argan oil for added smoothness.
Use Medium Heat Setting
After directing the dryer down the hair shaft, it’s imperative to shift gears to a moderate heat setting.
This step is your hidden advantage in the blowout battle, shielding your hair from the dreaded heat damage.
Envision it as the armor protecting your hair in the confrontation against frizz.
By mastering this technique, you’re not merely drying your hair; you’re crafting a masterpiece with precision and care.
Sectioning and Drying
To straighten your hair with a blow dryer, you’ll need to section it off.
Start by pinning up the top layers of hair.
Then, gather a section at the bottom, drape it over a brush, and pull it taut.
Angle your blow dryer downwards along the section, brushing from roots to tips as you dry each section completely before moving on to the next.
Pin Top Layers of Hair
Pinning your top layers of hair is a vital step in sectioning your hair for drying.
Utilize hair pin clips to secure the top sections and keep them out of the way while you concentrate on drying the lower layers.
This method ensures that your hair dries evenly and allows you to focus on specific sections for styling.
Be mindful to clip the sections securely to maintain tension and encourage the drying process.
Gather Section and Drape Over Brush
- Divide your hair into manageable parts.
- Take a part and place it over the brush.
- Make sure the brush is taut enough to keep the hair straight.
- Angle the brush in the same direction as the hair.
- Keep the part size small enough for the brush.
- Pull the part taut to dry evenly.
Pull Section Taut
When drying your hair with a blow dryer, it’s vital to make sure that your hair is pulled tight to get the best results. Here are five steps to help you achieve a sleek blowout:
- Detangle hair: Before blow drying, make sure your hair is free of knots. Use a wide-toothed comb or wet brush to gently detangle your hair, starting at the ends and working your way up to the roots.
- Section hair: Divide your hair into small sections, using hair clips to keep them separate. This makes it easier to handle and dry each section individually.
- Use appropriate tools: Choose a round brush with nylon bristles that provide excellent tension for smoothing your hair. This will help prevent frizz and create volume.
- Maintain hair tension: As you blow dry each section, keep your hair tight by pulling it up and away from your scalp. This will help to stretch the hair and reduce the risk of damage.
- Dry section by section: Start at the roots and work your way down to the ends, using a low heat setting for fine hair and medium heat for thicker hair. Aim the airflow down the length of your hair, following the direction it naturally falls.
Angle Dryer Down and Move Along Hair
To blow dry hair straight, it’s imperative to angle the blow dryer in the same direction as your hair’s natural growth.
This will help maintain the hair’s integrity and prevent damage.
Hold the dryer several inches away from your head and use a moderate heat setting to minimize damage.
You can also use a round brush to guide the hair in the desired direction while blow drying.
Apply tension on the section you’re working on and move the dryer along the hair shaft in a downward motion.
Brush From Roots to Tips
As you master the art of hair drying, remember to keep your brush angle sharp and your grip firm.
With each stroke, pull taut from root to tip, ensuring the boar bristles glide smoothly.
This technique not only tames your mane but also paves the way for a sleek, polished finish.
Keep up the rhythm, and you’ll have those locks falling perfectly into place.
Dry Section Completely
To dry a section of hair completely, follow these steps:
- Section hair: Divide your hair into manageable sections using clips or hair ties. This allows for even drying and allows you to concentrate on one area at a time.
- Gather section: Hold the section of hair with your hand or use a brush to gather it, making sure it’s taut and not too large.
- Angle dryer: Hold the hairdryer at a 45-degree angle to the hair shaft, pointing it downwards.
- Move along hair: Slowly move the hairdryer along the hair, brushing from roots to tips with a gentle bristle brush.
- Repeat on remaining sections: Once the first section is dry, move on to the next one, following the same technique.
Remember to use a heat protectant product before blow-drying to protect your hair from heat damage. Also, avoid using the hairdryer too close to your hair to prevent overheating and damage.
Repeat on Remaining Sections
To achieve straight hair, repeat the blow drying process on the remaining sections. Here’s how:
- Brush Selection: Use a gentle wet brush for fine hair and a metal brush for thicker hair.
- Hair Sectioning: Pin top layers of hair and gather sections, draping them over a brush.
- Dryer Angles: Angle the dryer down and move it along the hair.
- Heat Settings: Use a medium heat setting and dry each section completely.
Finishing
Once you’ve thoroughly dried your hair using the proper sectioning and brushing techniques, switch your blow dryer to the cool setting.
Run it over your hair to help set the straightened style.
Finish by applying a small amount of anti-frizz serum or argan oil to tame any flyaways and add shine.
Use a straightening iron if you desire an ultra-sleek, bone-straight look.
Use Cool Setting to Finish
To achieve a smooth, cool finish for your hair, use the cool setting on your blow dryer.
This setting helps to set the style and adds shine to your hair.
It also helps to reduce frizz and flyaways, giving your hair a polished look.
To use the cool setting effectively, point the dryer downwards and move it along your hair in a downward motion.
This will help to lock in the style and give your hair a sleek, finished look.
Apply Anti-frizz Serum or Argan Oil
To achieve a sleek and frizz-free finish on your hair, it’s critical to use the appropriate products and follow the correct technique. After blow-drying, you can enhance your hair’s luster and control frizz by using smoothing serums or argan oil. These products work by creating a barrier around the hair cuticle, smoothing the porous surface, and preventing moisture from entering, causing swelling.
To apply the serum or oil, lightly mist or apply it onto damp hair or into your hands, then distribute it evenly throughout your hair. Comb through your hair to guarantee even distribution and style as usual. For optimal results, pair these products with a suitable shampoo and conditioner that cater to your hair type.
Use Straightening Iron for Bone-straight Hair
To achieve bone-straight hair using a blow dryer, follow these steps:
- Apply a heat protectant product to your hair before blow drying. This will create a protective barrier between your hair and the heat of the dryer, reducing the risk of damage.
- Use a wide-toothed comb or a gentle wet brush to remove any tangles in your hair. This will make it easier to blow dry and help prevent breakage.
- Hold the hair dryer several inches away from your head and dry your hair 80% without using a brush. This will help to minimize damage from the heat.
- Comb through your hair to help all layers dry evenly and point the dryer down the hair shaft. Use a medium heat setting to avoid overheating your hair.
- Once your hair is mostly dry, section it and use a boar bristle roller brush for smoothness or a metal brush for style, curl, and movement. Angle the brush tool in the desired hair direction and make sure the sections aren’t larger than the tool.
- Repeat the process on all sections of your hair, ensuring that each one is completely dry before moving on to the next.
- Finish by using a cool setting on your hair dryer to set the style and apply a lightweight anti-frizz serum or argan oil to add shine and control any remaining flyaways.
Tools and Accessories
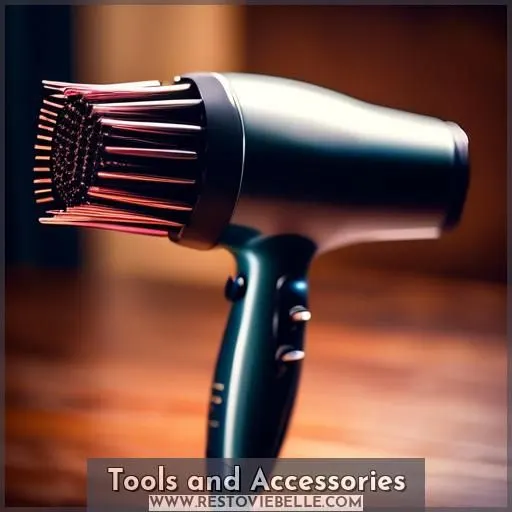
To achieve straight hair with a blow dryer, you’ll need a few essential tools: a hair dryer with a concentrator nozzle, a wide-toothed comb, a large round boar-bristle brush, a heat protectant product, and a hair oil or anti-frizz serum. Having the right accessories makes sure your hair dries evenly and remains smooth and frizz-free.
Hair Dryer With Nozzle
With regards to blow-drying your hair, the appropriate tools can make a significant impact.
A hair dryer equipped with a nozzle attachment is an essential accessory for obtaining smooth, tangle-free outcomes.
This attachment assists in guiding the airflow, preventing hot air from blowing directly onto your hair and causing damage.
Furthermore, certain hair dryers include diffuser attachments, which are ideal for individuals with curly hair.
For added convenience, consider purchasing a hair dryer stand to maintain your tools organized and readily available.
And for an additional enhancement of shine, seek hair dryers with ionic technology or a ceramic coating.
Wide-toothed Comb
For optimal blow drying outcomes, employing appropriate tools is essential. A wide-toothed comb is an indispensable accessory. This type of comb is ideal for detangling hair, both wet and dry, minimizing breakage, and promoting volume and separation during hair fluffing.
Wide-toothed combs offer various advantages for hair care. They’re gentler on wet hair, reducing tangles and breakage. The wider the teeth, the less damage inflicted. These combs are suitable for all hair types, including straight, wavy, curly, and coily textures.
For effective use, begin by gently detangling hair in the shower or bath while it’s wet and conditioned. This prevents the formation of knots that can result in breakage and damage. If hair is extensively over-processed, air-drying it beforehand may be necessary before attempting to comb out knots.
Large Round, Boar-bristle Brush
Choosing the right brush is like picking the perfect wingman for your blow-drying adventure.
A large round, boar-bristle brush is your go-to. Its natural bristles glide through hair, offering just the right amount of tension without tugging.
The size and shape matter too; they make sure your hair dries evenly and gets that salon-smooth finish.
Heat Protectant Product
To attain the optimal outcomes when blow-drying your hair, it’s imperative to utilize a heat protectant product. Heat protectants establish a shield around each strand of hair, safeguarding it from the heat and preventing damage such as moisture depletion, protein deterioration, and bond breakage. Here are three essential considerations when selecting and applying a heat protectant product:
- Product Selection: Choose a heat protectant that aligns with your hair type and concerns. For delicate hair, opt for a lightweight product to avert product buildup. For thick hair, consider an oil or cream-based heat protectant. If your hair is curly, seek a product that can combat frizz and amplify shine.
- Application Methods: Apply the heat protectant to damp hair prior to styling. Sprays are the simplest to use and distribute evenly, while creams can offer additional moisturizing benefits. Always adhere to the manufacturer’s instructions for optimal results.
- Different Hair Types: Heat protectants aren’t universally applicable. Take into account your hair type when selecting a product. For example, if your hair is fine, choose a lightweight product to prevent buildup, while those with thick hair may prefer an oil or cream-based heat protectant.
Hair Oil or Anti-frizz Serum
Protect your hair from humidity and frizz with a hair oil or anti-frizz serum. These products work by sealing the cuticle and locking in moisture, preventing frizz from forming. Apply a small amount to your hair after blow drying and before styling for best results.
Frequently Asked Questions (FAQs)
How can I prevent my hair from getting frizzy while blow drying?
You’ll want to use a heat protectant and hydrating serum before blow drying. Work in small sections, keeping the dryer moving and using a concentrator nozzle to control airflow. Finish with a cool shot to help seal the cuticle.
What is the best heat setting to use when blow drying hair straight?
For straight locks, use the highest heat setting, babycakes. High temps tame frizz and lock in sleekness. But go easy – keep that nozzle moving to avoid scorching strands. With practice, you’ll be a blowout boss in no time!
How often should I use a heat protectant product when blow drying my hair?
You think you’re protecting those luscious locks, but the truth? Heat protectant should be your BFF every single time you blow dry, no exceptions. Your hair will thank you for putting its safety first.
Can I use a round brush to blow dry my hair straight?
You can definitely use a round brush when blow-drying for straight hair. Just make sure you’re using a brush with tightly packed bristles that can grip your strands firmly. Apply some tension as you pull the brush down the lengths to stretch and smooth the cuticle.
How can I achieve a smooth finish when blow drying my hair straight?
You’ll achieve a ruler-straight, glossy finish by blow drying hair in small sections with a boar bristle brush. Locking in that smoothness? Blast each section with the cool shot button to seal the cuticle – your strands will be smoother than a hotrod’s fresh paint job!
Conclusion
Perfecting the technique of how to straighten hair with blow dryer takes practice, but yields smooth, frizz-free results. Utilize the right tools – a dryer with nozzle, boar-bristle brushes, and heat-protecting products. Diligently section and tightly brush dry each part. Complete with a cool shot and anti-frizz serum for glossy, sleek locks that last.
